Total Pageviews
I m on Twitter!
Sunday, March 25, 2012
Counter Strike 1.6
GTA 4 Full Game Download (15.61GB)
Call Of Duty 4 Modern Warfare
RAM: 512MB RAM (768MB for Windows Vista)
Harddrive: 8GB of free hard drive space
Video card (generic): NVIDIA(R) Geforce(TM) 6600 or better or ATI(R) Radeon(R) 9800Pro or better.
Saturday, March 24, 2012
IDM 6.10 Build 8 FINAL FUll with Patch Tool Life Time | 4.6 MB | Mediafire

Fet Buffer for amplifiers
source: http://cappels.org/dproj/edfet/edfet.html
The EDFET drives like a FET, but with the bias stability of bipolar. Amps of output current can be controlled by milliamps of input current. The current gain is a design choice dictated by bandwidth. Two of things you have to consider when adding a power output stage to an op-amp circuit are the frequency response and the cross-over distortion in that stage.
This is especially true with wide band amplifiers, where the unity gain crossover needs to be at several hundred kilohertz. The stage is driven much the same as a complimentary pair output stage, but with the current gain that comes with using FETs., and with feedback within the output stage that that extends the buffer's bandwidth and regulates the quiescent current. More predictable operation allows the designer to design a circuit lower overall power dissipation and better closed loop stability.
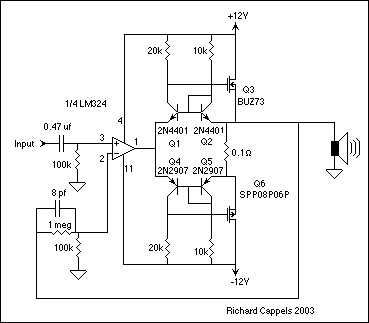
The EDFET complimentary buffer is made up of a pair of unity gain buffers, one that drives in the positive direction and the other that drives in the negative direction. Pictured above is the positive driving half of the output stage.
Gain to make the output signal track the input signal comes from inverting transistor, Q1. The input signal is applied to the emitter of Q1 and the output of the amplifier is raised one diode drop to match the forward base-emitter drop of Q1, by diode connected transistor Q2. The buffer's offset is determined by the log of the magnitude of the mismatch in the emitter currents in Q1 and Q2, and it is directly proportional to the absolute temperature.
Since the saturation current usually isn't published for the transistors this expression is only usefully for appreciating the dependence of junction voltage on current and temperature. You can come up with your own value of I0 for a given transistor if you know all the other parameters and solve the above formula for I0. By the way, since, for most practical uses, you will be running at more than a thousand times the saturation current, the "+1" term can be dropped from practical calculations.
As an example, for the audio amplifier using a EDFET buffer shown in Figure 1. The following assumptions are applied: The maximum output voltage is 5 VDC with respect to ground, the power supply (VA) is 12 VDC, the maximum gate voltage is 8 VDC, the input capacitance, Ciss of the BUZ73 is 500 pf, and an...
http://cappels.org/dproj/edfet/edfet.html
Discrete Buffer: Diamond Buffer
Discrete Buffer: JISBOS Buffer
50 watts transistor amplifier
The amplifier and speakers that can handle medium-power is designed to provide a strictly amateur. Accidental overloads can damage the speakers, it is not appropriate for small systems.
What amp settings do not contain an element of the first connection wiring must be careful to work with.
Characteristics of the transistor, the fan or heat sink is cooled enough to find out if you need to focus!
Tech. parameters:
Power: + - 28V
Power: 50W / 4 ohms
Input sensitivity: 250mW of
Input resistance: 50 kOhm
Frequency range: 30Hz to - 30kHz
Optimal mobile recording portable player to another amplifier Multi Media.
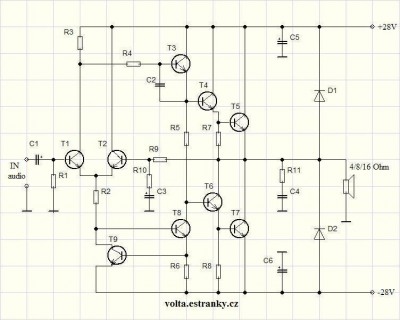
Here, the schematics this power amplifier
List of components:
R1, R2, R9 - 56K
R3 - 3K3
R4, R6 - 100R
R5 - 220R
R7, R8 - 120R
R10 - 1K
R11 - 1R
C1 - in 1µF / 35V
C2 - 33P - Ceramics
C3 - the 100µF/35V
C4 - 100 N (220N) - Ceramic
C5, C6 - 4.7 UF / 35V
D1, D2 - 1N4007
T1, T2, T9 - BC546
Q3 - BC640
T4 - BD139
T5, T7 - BD711
T6 - BD140
T8 - BC639
Following the DC voltage amplifier and limiter speaker protection is needed.
Pro Evolution Soccer
Intel Pentium 4 1.4GHz or equivalent
Recommended:
Pentium 4 3.0GHz/AMD Athlon 64 or better
Very Simply 10 Watts Stereo Power Amplifier-TDA2009A
Her main performance characteristics in the table below.
Power Supply Voltage: DC 8-24V/1-2A
Power Output:
- 10W RMS / channel, 4 ohm load, 24V/DC power;
- 6W RMS / channel, 8 ohm load, 24V/DC power;
- 4W RMS / channel, 4 ohm load, 12V/DC power.
S/N: >75dB/10W output
Frequency response: 10Hz-50kHz,-3dB
Gain: 36dB
Input Level: 100mV Full output power
Schematic and Prototype:
Principle and production elements:
C1, C2 as the input capacitor, C10, C11 for the output capacitor. C6, C7 for the feedback capacitance. R1/R2, or (R3/R4) control the amount of feedback. Amplifier gain is equal to 1 + (R1/R2) = 68, or 37dB. C4, C5 for the power supply filter capacitor. The device maximum supply voltage of 28V. Hours of work required to add TDA2009A heat sink, and should pay attention to the power lines and then the choice of speaker wiring. Input should use shielded lines and as short as possible. Welding TDA200A not take too long when you pay attention, action to be fast, but if you want their full integration with the circuit board.
Run Google Chromium OS on Your Notebook
Upgrading to BackTrack 5 R2
The long awaited release of the BackTrack 5 R2 kernel has arrived, and it’s now available in our repositories. With a spanking brand new 3.2.6 kernel, a huge array of new and updated tools and security fixes,
BT5 R2 will provide a more stable and complete penetration testing environment than ever before. We
will start a series of blog posts on how to upgrade, deal with VMWare, and even build your own updated BT5 R2 by yourself. For now though, here’s how to get the new kernel and all of the updated goodness:
1. Update and upgrade your BT5 (R1) installation:
apt-get update
apt-get dist-upgrade
apt-get install beef
reboot
Once that’s done, you should already have the new kernel installed as well as any last updates we have
for the official R2 release. You need to reboot to have the 3.2.6 kernel kick in.
2. OPTIONAL – Once rebooted, log back in, and get your pretty splash screen back.
fix-splash
reboot
On the next reboot, you should see the red console splash screen appear.
3. Verify that you are running a 3.2.6 kernel:
uname -a
You should see something like “Linux bt 3.2.6 …”
4. Feel free to install any or all of the new tools featured in BackTrack 5 R2:
apt-get install pipal findmyhash metasploit joomscan hashcat-gui golismero
easy-creds pyrit sqlsus vega libhijack tlssled hash-identifier wol-e dirb reaver
wce sslyze magictree nipper-ng rec-studio hotpatch xspy arduino rebind horst
watobo patator thc-ssl-dos redfang findmyhash killerbee goofile bt-audit bluelog
extundelete se-toolkit casefile sucrack dpscan dnschef
5. Add the new security updates repository to /etc/apt/sources.list, and run another upgrade.
echo "deb http://updates.repository.backtrack-linux.org revolution main microverse
non-free testing" >> /etc/apt/sources.list
apt-get update
apt-get dist-upgrade
During the last upgrade you’ll be asked about file revision updates. Make sure to always keep the
locally installed file. Feel free to press “Enter” and accept all the defaults.
6. Some of the newly installed services will be set to start on boot. We like disabling these as needed:
/etc/init.d/apache2 stop
/etc/init.d/cups stop
/etc/init.d/winbind stop
update-rc.d -f cups remove
update-rc.d -f apache2 remove
update-rc.d -f winbind remove
And…you’re done! Expect a more comprehensive introduction to BT5 R2, on the day of the Official
release – March 1st! The BackTrack 5 R2 ISOS will we available for download from site on March 1st
via Torrent only. HTTP links will be added a few days later.


